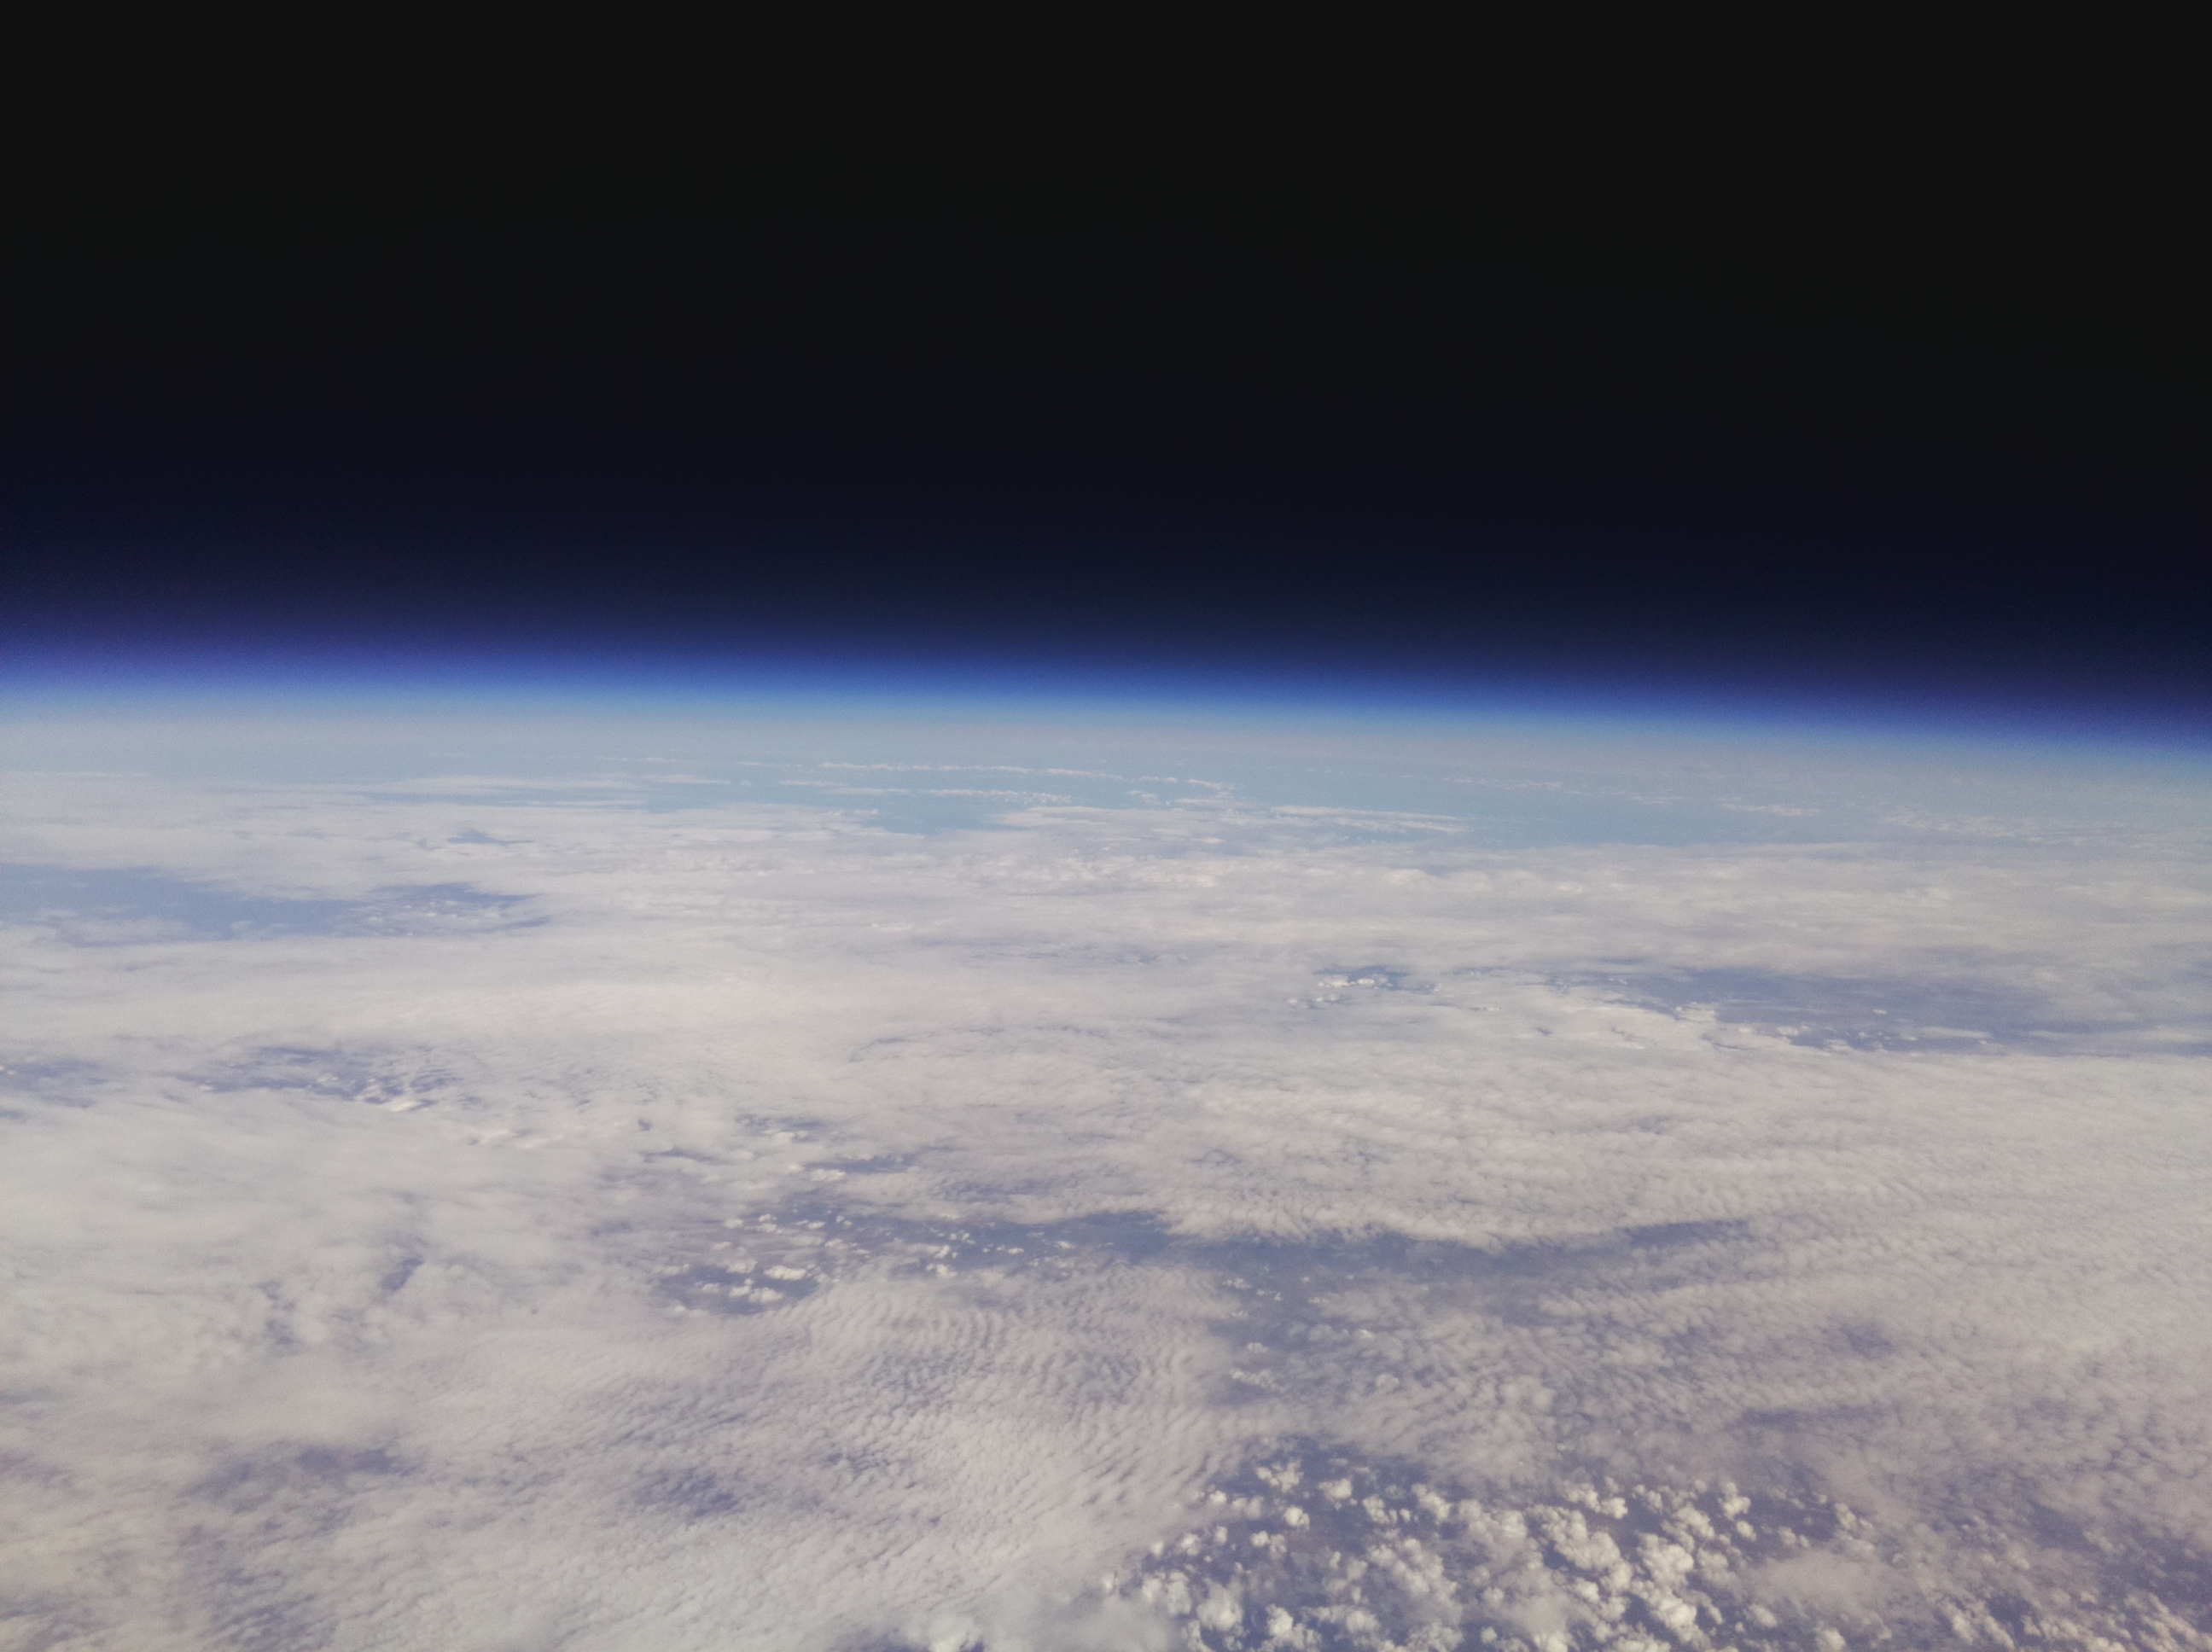
I designed, built and recovered a payload for a high altitude balloon that acquired photographs and video in addition to recording atmospheric variables, such as pressure and temperature, throughout a successful flight to an altitude of 35 km.
This was based on the excellent guides from Dave Akerman and Stratodean. You can also follow our guide below.
Short Highlights
Full Flight
Full uncut video of the flight, over 2.5 hours long but I have included links to interesting parts in the description.
We have now added the telemetry data as an overlay to the full video.
Guide
Radio
A good way to start with this project is to track other people’s balloons. Most payloads (box carried by the balloon) transmit radio signals around the 434MHz mark, this means that with the right aerial anyone (within a certain radius) can pick up the signals, decode them and upload them to a live map.
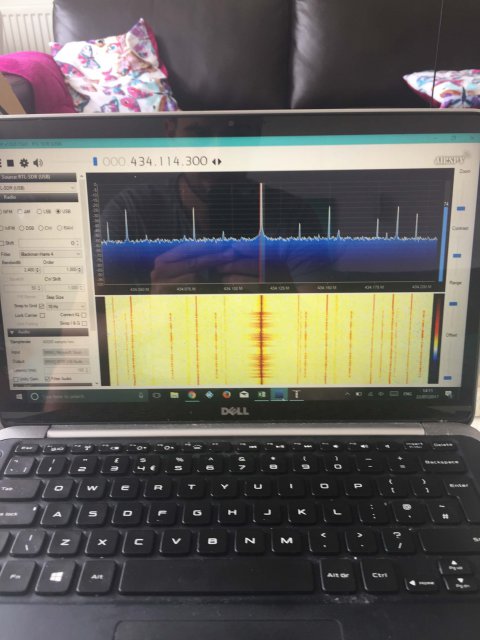
The first thing to get is a radio and a basic antenna (see later), the easiest and cheapest way to do this is to be a software defined radio (SDR). This plugs straight into the USB port on your laptop/computer, and uses software to do most of the work. The recommended software is SDR#, and we used the R820T2 RTL-SDR which is a pretty good model. The driver will need to be changed for the SDR, using Zadig. When the right driver is installed you should see a signal like this when you open SDR# (this is when the tracker is turned on).
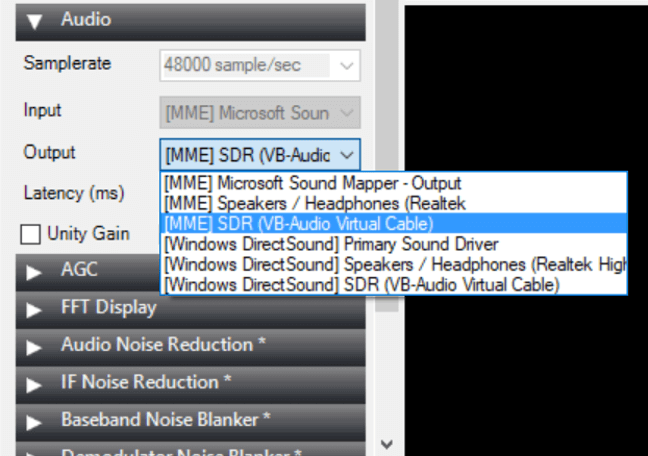
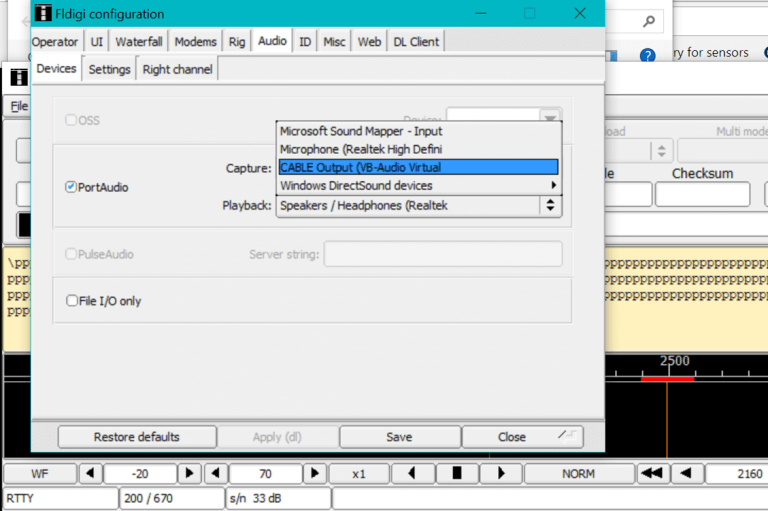
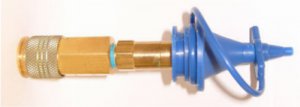
You can test the SDR setup by listening into the radio stations using the WFM mode. A very important piece of equipment is the amplifier, it is very difficult to get a good signal without one as I found out. When you buy an amplifier make sure it applies to the HAM band like this one, around 434MHz as mentioned before. Now the SDR works you will need to decode the information from the balloons, this is done with a modified version of dl-fldigi, a guide can be found here. However, this did not mention how to get the signal from SDR# to dl-fldigi. For this, you need to use VB-Cable which is a virtual cable that can connect two programs. In SDR# change the audio output to ‘MME SDR (VB audio virtual cable) in the first picture below. In dl-fldigi go to Configure -> Sound card and change capture to ‘Cable Output (VB-Cable audio virtual cable)’, you also need to change the settings in the operator section, this information will appear on the live map.
After reading which antenna would suit you best in the next section, you can now start to track of peoples balloons. Using the link the live map you can see when there is a balloon in the air, with the green circle showing you when the signal will be strong enough for a decent signal. Balloons that are launched should have submitted a payload document, which means that you can select the flight from the flight list in dl-fldigi, which will automatically assign the correct settings. However, if you are testing your own payload or want to make adjustments go to OP mode -> RTTY -> Custom. Once a signal has been found it should look similar to the picture below (my first successful ballon track):
![]()
The green banner shows that a good lock has been achieved, this string will then be uploaded to the live map.
Antenna
To start with I just used a simple magnetic whip antenna that would stick to the roof of a car. This is useful for when you just want to test if the SDR works, or to test your payload (which happened a lot). However, in order to track other balloons all around the country, it is worth investing in a Yagi antenna. At the start of the project, I was very optimistic about my antenna making skills so I made several basic antennas. I made a large collinear antenna by following a tutorial, which is basically 4 sections of coaxial cable soldered together to create a standing wave that would amplify the signal. I also made a very basic Yagi antenna as seen below out of thin copper wire and an old paint brush for a handle. This did pick up signals but was nowhere near as good as a proper Yagi.
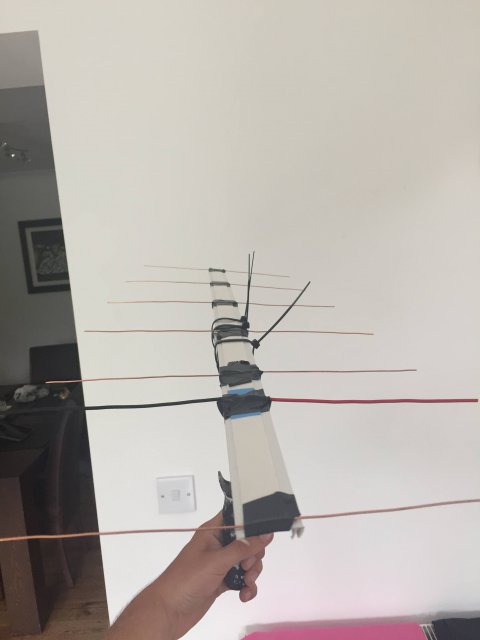
In the end we opted to buy the Diamond A430S10R 70cm 10 Element Yagi which worked really well and enabled us to track a balloon from Sheffield (~100 miles away).
Experiments
We used the Pi in the Sky board that connects on top of a Raspberry Pi A+ model. This gave us GPS location and radio transmitting capability, that would have otherwise taken months to achieve from scratch. This also came with source code that included support for a few sensors. One of these sensors was the BME280, which measures pressure, temperature and relative humidity so this was an obvious starting point. I had taken a course on astrophysics where we were taught about the structure of atmospheres on different planets. From this (and other prior knowledge) I knew that the temperature would show me the Troposphere and Stratosphere, whilst the pressure should exponentially decay. More research led me to an article describing how the speed of sound should vary with height, this was also something that was easily measured with an ultrasonic range finder (HCSR04).
I also knew that the Ozone layer blocked ‘UV’ light and on research, I found several sources that claimed that 90% of UVB (280-320nm) should be absorbed. I first bought a VEML6070 as I read that it would give real UV readings, as many sensors estimate UV from visible and IR intensity which is not suitable. After spending ages getting this to work, see later, I then realised that it only measures UVA which is not absorbed. I then bought a VEML6075 breakout board from China which actually arrived within two weeks, which could measure both UVA and UVB. I bought this as I thought I would see a large increase in UVB intensity after passing through the Ozone layer. If you read the report you will know that this wasn’t quite the case…
I originally chose the Raspberry Pi over the Arduino as I thought I could use Python to work with the sensors. However, this was not the case and I ended up just hacking some Arduino code to make the sensors work with the Pi in the Sky board, which can be found on my GitHub. So I would use the Arduino in future as there are a wider range of sensors that are easier to set up.
Photography
We chose a RPi camera as the stills camera, which gave excellent results.
For the video camera we chose a GoPro session which cost around £150. This go pro comes in a sealed case, but we had to leave the case open so that we could connect an Anker backup battery. We decided to leave the glass cover on the camera lens in place for the flight. We had no problems with this on the ascent, but the central part of the glass fogged up on the descent, so next time we would probably remove the glass.
Note that we tried a cheaper alternative which cost half the price of the GoPro, but this failed to record continuous video when tested in our fridge, failing after only 30 minutes under cold conditions.
Payload
We built the payload with 25mm styrofoam and UHU Por glue.
Backup Tracker
We used a backup tracker for peace of mind. This was a cheap GSM Tracker which we purchased from eBay. It requires a SIM card, which we sourced from AnywhereSIM with the idea that the SIM can swop automatically between providers (PAYG SIM from Argos). To get the location of the tracker you simply text it and it will send a reply text with its location and a link to the location on google maps. Testing showed the tracker to be remarkably accurate. However, we forgot to tape the battery into the unit and it became dislodged on landing and failed to respond (lesson learned).
Batteries
The payload will have a flight time of 3-4 hours and encounter external temperatures of -50C. It is essential to use Lithium batteries (Lithium Iron Disulfide). The best type is Lithium Energizer AA which can be obtained from Amazon, Ebuyer, Camera shops.
HabHub Payload Documents
The Habhub tracker is an excellent way to track your balloon and to have other people tracker it for you. It has a built-in link to the CUSF Flight predictor so that it predicts the flight path and landing location in real time and also stores all the information on who tracked the flight, their location and how many packets they received.
In order to get your flight to display on the HabHub Tracker you will need to submit two documents:
- Payload Document: submit this as soon as you have a working tracker that you have tested yourself. Once accepted your payload will appear on the Habhub tracker map and you can move around with it and see the map update.
- Flight Document: this is used to register your planned flight and broadcast the planned flight to other people who can track the flight. Do not create this until your payload document is working and only create it once you have a known flight date (e.g. 3-5 days before the flight).
Once your flight document has been created you will have to get it approved by logging on to the #HabHub IRC Channel. Just choose a nickname and connect to logon. Once joined type in:
- Flight Document ID and hit return (this should respond automatically with a status (e.g. Tested 5 minutes ago), which shows that the payload was registered correctly)
- Now type in a request for the Flight document to be approved. This requires one of the HabHUb administrators to be online so you may have to log in a few times before someone is around. You can type in the Payload ID again at any time and you will get an automatic message saying whether or not it has been approved.
Once the flight has been approved it should appear in the list of flights in the HabHub Tracker webpage, though this may take a day or so. It should also appear in the flight list of the Tracking app (iOS).
It is also a great idea to go the UKHAS Google Groups site and post a message about your planned flight and ask people to track it by giving details of the frequency, launch time, etc.
There is an excellent and detailed guide to the process here
Note that there is a list of all #highaltitude commands to use on irc.freenote.net here.
Balloon
A weather balloon cannot be purchased without knowing the weight of the payload. We managed to keep the weight of our payload just below 1kg, including all items other than the balloon. We wanted to get well above the ozone layer for our experiments so we purchased a 1200g Hwoyee. With our payload this was predicted to reach 33.5km, but actually reached 35km.
There is a Meteorological Balloon Burst Estimator on the Random Engineering Website. Simply enter the balloon type, type of gas (Hydrogen / Helium), payload weight and the desired ascent rate (5m/s) and click calculate. This will calculate the amount of gas required, which is important as with our 1600g balloon and 1kg payload, we could fill it with a medium gas cylinder which is much easier to move around than the full size cylinder, and also cheaper.
Helium
There are two main supplier of helium in the UK, namely BOC and AirProducts. However, buying directly from these supplier is very expensive and you may also have to purchase or rent a regulator.
However, these supplier sell the same gas through resellers for a much lower price as follows:
BOC T (Medium) Cylinder costs £185 plus BOC recommend the purchase of a filling kit for £54
The same BOC cylinder can be purchased from BalloonHelium.co.uk for £106 (collection) or £141 (delivered to a business address). This price includes 28 day cylinder hire, which can be extended for £9 / month. This price includes an inflator kit. (We chose the balloon inflation kit which just allows a hosepipe to be jubilee clipped onto the end.
AirProducts supply helium in lighter Balloonium cylinders, which include a built in regulator and a quick connector (Universal Inflator). The Medium cylinder contains 5.61 cu.m which is more than the BOC T-Cyclinder 3.6cu.m.
Parachute
Choosing a parachute requires you to know the weight of the payload. There are two main manufacturers (Rocketman and Spherachute) and both types can be purchased from Random Engineering. We chose a Sphaerachute 36” is this gave us a wide range of payload weights and the parachute was lighter than the equivalent Rocketman. These can be purchased from Random Engineering or Spherachutes.
You will also need a Nylon rope for connecting the payload to the balloon. Must be less than 50 pounds breaking strain and ideally braided to reduce the spinning of the payload during flight. This is supplied by Random Engineering.
Launching
Filling the Balloon
- Layout the tarpaulin and prepare the balloon, filling apparatus and helium
- Check the CUSF flight and landing calculator. Change the parameters such as climb rate, launch time to determine the optimal amount of helium to be used to fill the balloon, together with the corresponding neck lift.
- Using a set of scales pour water into a container up the the required necklift and attach this container to the balloon neck
- Turn on the tracker and check the LED lights to see that everything is working. Using your tracking device check that you can successfully upload data packets to the HabHub Tracker. Once you are happy start your cameras and seal the payload, checking that all the camera lenses are clear.
- Check that the backup tracker is working
- Begin filling the balloon with helium until the weight attached to the neck of the balloon clearly is suspended off the floor (i.e. it does not bounce up and down on the ground)
- Phone the local air traffic control to get permission to launch
- Check all around to see there are no aircraft nearby and launch.
Balloon Filling Equipment and connection to the balloon
We followed the design shown on the following website, but used two cable ties to affix the balloon neck. The neck connector was made using 40mm PVC waste pipe, pipe insulation and mastic.
We managed to connect this to a balloon filling nozzle on the helium cylinder using a jubilee clip and some duct tape.
NOTAM
This is a requirement to launch a weather balloon in the UK (see more details here. It is imperative that a NOTAM is obtained to ensure a safe launch and also to preserve the reputation of all other High Altitude Balloon enthusiasts.
Note that you must apply for the NOTAM at least 28 days before launch.
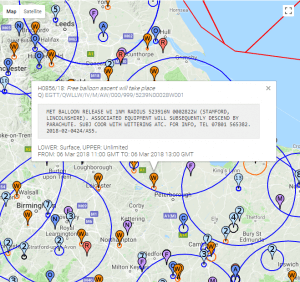
You can view all the current NOTAM’s on a map at the following website.
Note that your Notam will not appear on this map until you have confirmed that the flight is going ahead.
The image below shows an example of a weather balloon Notam:
Before applying for a Notam you will require:
- A launch site, with permission from the landowner
- The Latitude / Longitude / altitude of the launch site and the grid reference location
- URL Link to on online map of the launch site (google maps link)
- The dates you want to launch (you can specify a date window)
- The time of launch (11am is a good time to avoid incoming / outgoing transatlantic flights from London airports)
- The size and dimensions of the balloon you will be using (ground level)
- The weight of your payload
- The thickness and type of rope used on the payload
Choosing a Launch Site
You should use the NOTAM map to get an initial idea of where to choose a safe launch site.
You will also require some knowledge of UK airspace flight corridors and the location of active airfields as it is unlikely that a NOTAM launch application will be successful if it is in close proximity to an airfield or one of the main flight paths. There is an online map of UK flight corridors at SkyVector or you can follow the live tracks of airline flights at Flight Radar 24
Application Procedure
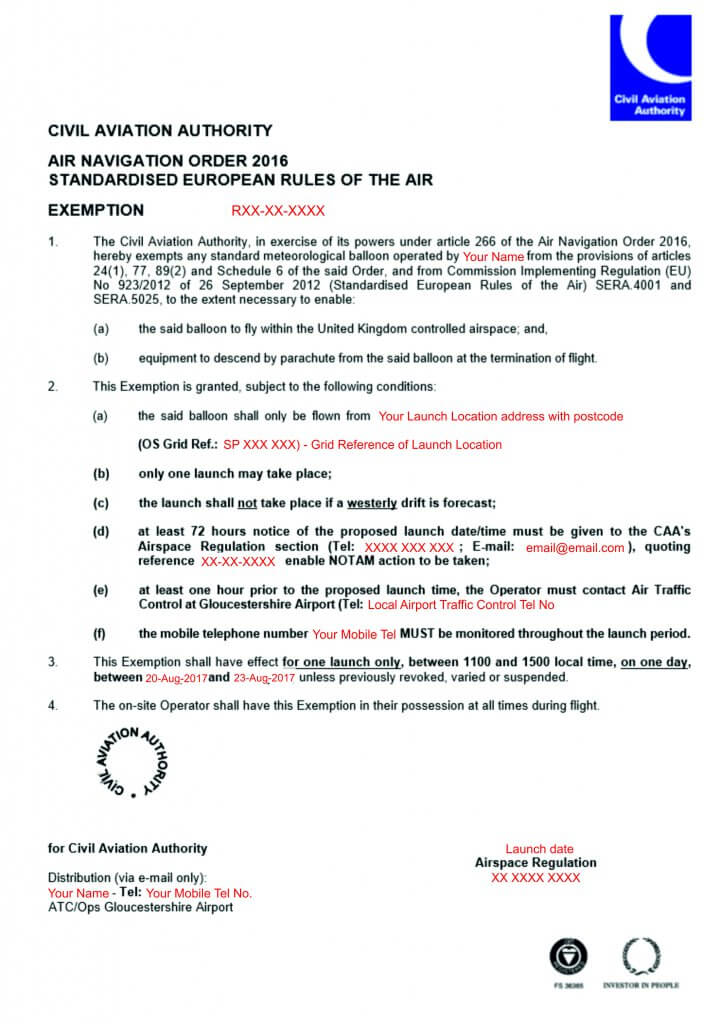
Apply for a CAA Flight Exemption Certificate at least 28 days before the planned launch.
Application for a NOTAM is made online at the following website
Choose the lower link which opens an interactive Adobe Acrobat File. You then complete the form and press submit and you should almost immediately receive a reply to confirm receipt. However, my form would not submit from my Browser window, so I had to download the file, open in Acrobat and then submit the form directly from Acrobat.
Once you have submitted your NOTAM application you will receive an email notification of successful submission.
Wait for the receipt of the Examption Certificate
This will arrive be email and will state any limitations on the flight and the people to contact to generate a NOTAM and on the day of the launch. For our launch this arrived 8 days before launch.
Choose the date and time of the launch (if you gave a launch window)
Check the landing predictions and weather forecasts to choose which is the best day to launch your balloon. Using the CUSF landing predictor we saw large changes in the prediction until it stabilised 3-4 days before launch.
Contact the CAA to generate a NOTAM at least 72 hours before launch
Your exemption certificate will give details of who to contact in the CAA. This must be done to generate a NOTAM, which will then be visible to pilots to plan their flightpath. You can then check that the NOTAM is issued by visiting the NotamInfo website.
Contact the local traffic control on the morning of the launch
Details of the nearest air traffic control will be detailed on the Exemption certificate.
Contact local traffic control immediately before launch.
You may be notified of an approaching aircraft and asked to briefly postpone the launch.
Contact the CAA if the flight launch is cancelled for any reason.
Below is our NOTAM:
USA Payload Testing Safety
In the USA tests were undertaken to determine the risk of a balloon payload penetrating the fuselage of an aeroplane. The conclusions were:
- Maximum payload weight must be 4 pounds (1.81 kg)
- Size to weight ratio must be less than 3 ounces/square inch (13 gram/sq.cm) (total payload weight divided by its smallest face)
- Total payload weight in the case of multiple payloads must be less than 12 pounds
- Rope from payload to balloon must require a force of less than 50 pounds to separate the payload from the balloon
These rules do not apply to the UK but can be used as a guide and suggest the following:
- Use of 50lb braided line is suggested for connecting the balloon to the payload (the braiding stops the spinning of the payload during flight)
- Try and keep the payload weight as light as possible
- Spread out the heavy items within the payload to reduce the concentration of weight per area